Introduction to Nail Drills
Whether you’re a professional manicurist, pedicurist, or a beauty salon owner, understanding the tools of your trade is essential. One such tool that plays a pivotal role in nail care and beautification is the nail drill. Let’s delve into what a nail drill is and why it’s so important in manicures and pedicures.
-
- What is a nail drill?
A nail drill, also known as a nail file machine, is a high-speed, hand-held device used in manicures, pedicures, and other nail treatments. It’s designed to shape, clean, and polish the nails, making them look neat and attractive. The drill uses a variety of bits, each designed for a specific task such as removing cuticles, smoothing ridges, or buffing the nail surface. Learn more about nail drills on Wikipedia.
-
- Importance of nail drills in manicures and pedicures
Nail drills are an integral part of manicures and pedicures. They allow for precise shaping and buffing, helping to create a smooth, even surface for nail polish application. Nail drills can also be used to remove dead skin and calluses around the nail bed, promoting healthier nails and skin. Furthermore, they speed up the process, making it more efficient for both the professional and the client.
In the following sections, we will explore different nail drill techniques, how to use a nail drill for manicures and pedicures, their role in beauty salons, and how to take care of your nails using a drill. Stay tuned!
Nail Drill Techniques
Mastering nail drill techniques can significantly enhance the quality of your manicures and pedicures. Whether you’re a professional in a beauty salon or a DIY enthusiast, understanding the basics can make a world of difference. Let’s delve into some basic nail drill techniques.
Basic Nail Drill Techniques
There are three fundamental techniques that every nail drill user should know: proper handling of the nail drill, choosing the right drill bit, and speed control. These techniques form the foundation of all nail drill operations.
Proper handling of the nail drill
Handling the nail drill correctly is crucial for achieving the desired results and ensuring safety. Hold the drill like a pen, with a firm but relaxed grip. This will give you better control and precision. Always remember to keep your hand steady and move the drill in one direction to avoid damaging the nail.
Choosing the right drill bit
There are various types of drill bits available, each designed for a specific task. For instance, a cone-shaped bit is ideal for cleaning underneath the nails, while a cylindrical bit is perfect for shaping and shortening the nails. Choosing the right bit not only improves the outcome but also reduces the risk of nail damage. For more information on different types of drill bits, you can visit Wikipedia’s page on nail drills.
Speed control
Controlling the speed of your nail drill is key to achieving a smooth and even finish. Start at a low speed and gradually increase it as needed. Remember, high speeds are not always better. In fact, using excessively high speeds can cause heat and discomfort, and may even damage the nail. Therefore, always adjust the speed according to the task at hand.
Mastering these basic nail drill techniques will not only improve the quality of your work but also increase your efficiency and safety. Practice these techniques regularly to become more proficient and confident in using a nail drill.
Advanced Nail Drill Techniques
Now that we’ve covered the basics, let’s delve into some advanced techniques you can use with your nail drill. These methods can help you create stunning nail art and repair damaged nails.
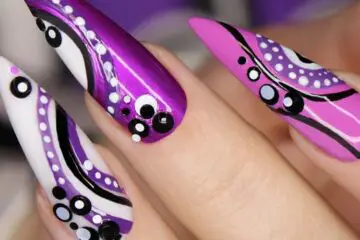
- Creating nail art with a drill
Nail drills aren’t just for maintenance and repair; they can also be used to create intricate nail art. With a steady hand and a bit of creativity, you can use your drill to etch designs into the nail surface. Here’s how:
- Choose a small, pointed drill bit for detailed work.
- Start with a simple design, like a dot or a line. As you gain confidence, you can try more complex patterns.
- Keep the drill moving to avoid creating deep grooves in the nail.
- Once you’re happy with your design, seal it with a clear top coat to protect your art and add shine.
Remember, practice makes perfect. Don’t be discouraged if your first few attempts don’t turn out as you hoped. With time and patience, you’ll be creating beautiful nail art in no time.
- Using a nail drill for nail repair
Nail drills can also be a lifesaver when it comes to nail repair. Whether you’re dealing with a broken nail or a lifted acrylic, a drill can help you smooth out the damage and prepare the nail for repair. Here’s a step-by-step guide:
- Choose a medium-grit drill bit to remove any lifted product or smooth out a break.
- Use a gentle touch and keep the drill moving to avoid causing further damage.
- Once the damaged area is smooth, you can apply a repair product or fill in with acrylic as needed.
Remember, if the damage is severe or painful, it’s best to seek professional help. But for minor repairs, a nail drill can be a handy tool to have in your kit.
Mastering these advanced nail drill techniques can take your manicure and pedicure skills to the next level. Whether you’re a professional nail technician or a DIY enthusiast, a nail drill is a versatile tool that can help you achieve beautiful, healthy nails.
Nail Repair Methods Using Nail Drills
When it comes to nail care, nail drills are an essential tool. They can be used for a variety of purposes, from shaping and buffing nails to repairing damage. In this section, we will discuss three key methods of nail repair using a nail drill: fixing cracked nails, repairing nail damage, and maintaining nails with a drill.
-
- Fixing Cracked Nails
A cracked nail can be a painful and unsightly problem. Thankfully, a nail drill can be used to fix this issue. The first step is to clean the nail thoroughly. Then, using a fine drill bit, gently grind down the cracked area until it is smooth. Apply a nail repair gel and use the drill to buff it until it blends seamlessly with the rest of the nail. This method can restore the nail’s appearance and prevent further damage.
-
- Repairing Nail Damage
Nail drills can also be used to repair other types of nail damage, such as chips or splits. The process is similar to fixing a crack. First, clean the nail and then use the drill to smooth out the damaged area. Apply a nail repair product and buff it with the drill until it is smooth. This can help to restore the nail’s strength and appearance.
-
- Nail Maintenance with a Drill
Regular maintenance can help to prevent nail damage in the first place. A nail drill can be used for this purpose. Use a fine drill bit to gently buff the surface of the nail, removing any rough spots or ridges. This can help to keep the nails smooth and healthy. Regular maintenance with a nail drill can also help to prevent issues such as cracking or splitting.
Remember, while nail drills are a powerful tool, they should be used with care. Always follow the manufacturer’s instructions and never use a drill on a nail that is infected or severely damaged. If you are unsure, it is always best to seek professional advice.
Using Nail Drill for Manicures and Pedicures
When it comes to maintaining the health and beauty of our nails, nail drills play a crucial role. They are especially useful in manicures and pedicures, providing a professional finish that is hard to achieve with traditional nail files. Let’s delve into how to use a nail drill for manicures.
Manicure Nail Drill Usage
Using a nail drill for manicures involves three main steps: preparation of the nails, application of the nail drill, and post-drill care. Let’s break each step down:
- Preparation of the nails: Before you start with the nail drill, it’s important to prepare your nails. This includes cleaning your nails thoroughly and trimming them to the desired length. You can use a nail brush and warm soapy water to clean the nails. After cleaning, dry your nails properly to prevent any fungal infection. Read more about nail preparation on Wikipedia.
- Application of nail drill: Once your nails are prepared, it’s time to use the nail drill. Start by choosing the right drill bit for your needs. For manicures, a fine grit bit is usually suitable. Hold the drill in your dominant hand and your nail in the other. Apply the drill to your nail, moving it in one direction only. Be careful not to press too hard or you could damage your nail.
- Post-drill care: After using the nail drill, it’s important to take care of your nails. Apply a moisturizing cuticle oil to nourish your nails and prevent them from drying out. Also, consider applying a nail strengthener to protect your nails from future damage.
By following these steps, you can achieve a professional-looking manicure at home using a nail drill. Remember, practice makes perfect, so don’t be discouraged if you don’t get it right the first time. With patience and practice, you’ll soon be a pro at using a nail drill for manicures.
Pedicure Nail Drill Usage
Understanding how to use a nail drill for pedicures can significantly enhance the quality of your services and the satisfaction of your clients. The process can be broken down into three main steps: preparation of the nails, application of the nail drill, and post-drill care.
Preparation of the Nails
Before you begin using the nail drill, it’s crucial to prepare the nails properly. Start by cleaning the feet thoroughly and drying them off. Next, trim the nails to the desired length using a nail clipper. Use a nail file to shape the nails and remove any sharp edges. Finally, apply a cuticle remover to soften the cuticles and push them back gently with a cuticle stick. This preparation stage is key to achieving a smooth and even surface for the nail drill.
Application of Nail Drill
Once the nails are prepared, you can start using the nail drill. Choose the appropriate drill bit based on the client’s nail condition and your desired outcome. Start the drill at a low speed and gradually increase it as needed. Always keep the drill moving to avoid generating excessive heat and causing discomfort. Use the drill to buff the surface of the nails, remove any remaining cuticle, and smooth out ridges and bumps. Remember, the goal is to create a smooth, even surface for the application of nail polish or other treatments.
Post-Drill Care
After using the nail drill, it’s important to provide proper post-drill care. This includes applying a nourishing cuticle oil to rehydrate the nails and cuticles, and a moisturizing lotion to the feet. If you’re applying nail polish, make sure to use a base coat first to protect the nails from staining. Finally, advise your clients on how to care for their nails at home to maintain the results of the pedicure.
In conclusion, using a nail drill for pedicures can greatly enhance the quality of your services. By properly preparing the nails, using the drill correctly, and providing thorough post-drill care, you can ensure your clients leave your salon with beautifully manicured feet.
Nail Drill in Beauty Salons
Beauty salons are a hub of various aesthetic treatments and nail care is one of the most sought-after services. Among the many tools used in nail care, the nail drill stands out for its efficiency and versatility. Let’s delve into the usage of professional nail drills, their benefits in salons, and a case study on nail repair using nail drills.
-
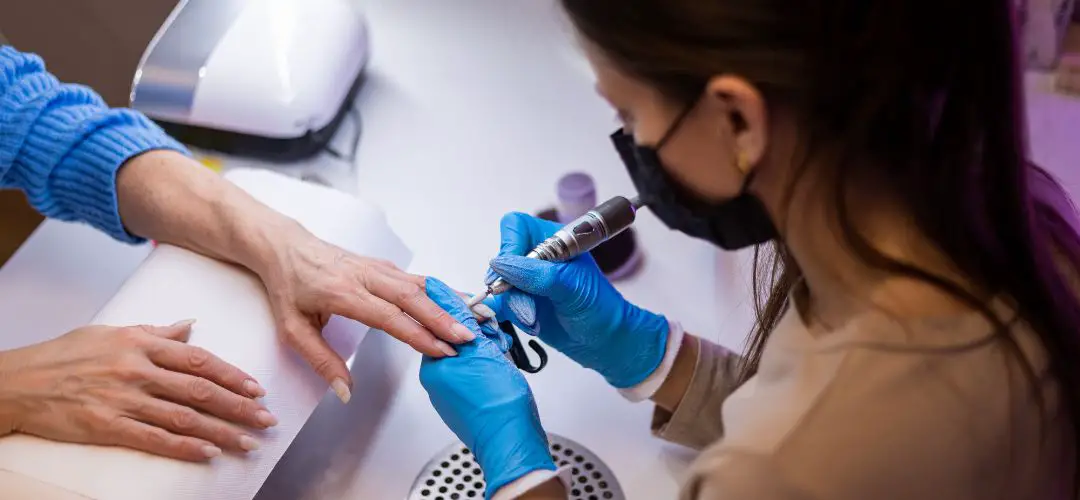
- Professional Nail Drill Usage
A professional nail drill is a high-speed, power-driven tool used to shape and buff the nails, remove gel polish, and clean up the cuticles. It’s a staple in beauty salons due to its ability to perform a variety of tasks with precision and speed. The drill bits come in different shapes and sizes to cater to various nail care needs. Wikipedia provides more detailed information on the types of nail drill bits and their uses.
-
- Benefits of Using a Nail Drill in Salons
Using a nail drill in salons has several benefits. It saves time and effort by quickly removing gel polish and acrylic nails. It also helps in shaping the nails more precisely than a manual file. Moreover, it’s a great tool for cleaning up the cuticles, which is crucial for a neat and clean manicure or pedicure. The nail drill also reduces the risk of nail damage when used by a trained professional.
-
- Case Study: Nail Repair in Salons
Let’s look at a case study that highlights the effectiveness of nail drills in nail repair. A client came into a salon with a broken acrylic nail. The nail technician used a nail drill to gently remove the remaining acrylic without causing further damage to the natural nail. Then, using the same tool, the technician prepared the nail for a new acrylic application. The client was pleased with the result, which was a smooth, natural-looking nail. This case study demonstrates how a nail drill can be used effectively for nail repair in a salon setting.
Nail Care with Drill
When it comes to maintaining the health and beauty of your nails, using a nail drill can be an effective tool. However, it’s important to use it correctly to prevent damage and ensure the best results. Let’s explore some preventive measures, regular maintenance tips, and key takeaways for nail care with a drill.
-
- Preventive Measures for Nail Damage
Preventing nail damage is crucial when using a nail drill. Always ensure your drill is clean and sanitized before use to avoid infections. Use the drill at a low speed to prevent heat build-up, which can cause burns and damage to the nail bed. Never use a drill on thin, brittle, or damaged nails. Instead, opt for hand filing. Lastly, always use a drill with a gentle touch. Applying too much pressure can cause discomfort and potential damage. Learn more about nail care and management here.
-
- Regular Nail Maintenance with a Drill
Regular maintenance with a nail drill can help keep your nails looking their best. Start by choosing the right drill bit for your nail type and desired result. Use the drill to gently buff the surface of your nails, removing any ridges or unevenness. Then, use the drill to shape your nails, following the natural curve of your nail. Finish by using a finer grit drill bit to smooth and polish your nails. Remember to always moisturize after using a nail drill to keep your nails and cuticles hydrated.
-
- Key Takeaways for Nail Care with a Drill
Using a nail drill can be a great way to maintain the health and beauty of your nails. However, it’s important to use the tool correctly to prevent damage. Always ensure your drill is clean and sanitized, use a low speed to prevent heat build-up, and never use a drill on thin or damaged nails. Regular maintenance with a nail drill can help keep your nails looking their best, but remember to always moisturize after use. With these tips in mind, you can effectively use a nail drill for your nail care routine.
Conclusion
-
- Summary of the Importance of Nail Drills: Nail drills are a crucial tool in the beauty industry, especially for manicures, pedicures, and nail repair. They allow for precise shaping, buffing, and polishing of nails, contributing to a professional and polished look. Nail drills also play a significant role in maintaining nail health by removing dead skin cells and preventing nail diseases. They are a must-have for every beauty salon and are also beneficial for home use.
- Final Thoughts on Nail Repair and Maintenance with a Drill: Nail drills are not just about aesthetics; they are also about nail health. Regular use of a nail drill can help to keep nails strong and healthy, prevent nail splitting and peeling, and promote nail growth. However, it’s essential to use the nail drill correctly to avoid damaging the nail bed. With proper use, a nail drill can be a game-changer in your nail care routine, providing you with salon-quality results at home.